Prompts are ways we help our learners demonstrate new skills. We use prompts to get our students to greet a peer, flush the toilet, name the color blue, and clap their hands. Prompts are something we add to the situation because the natural or teaching cue was not enough to cause the student to respond. The natural cue of being finished using the toilet was not a strong enough reminder to flush the toilet so we added the verbal prompt, “flush the toilet” and the student now responds. Prompts are important but fading them is just as important. Prompt fading in ABA needs to be planned from the start and is an integral and essential component to the plan. Unless you are committing to following that child around for the rest of his life and tell him to flush the toilet – prompt fading is essential.
Some rules for prompt fading in ABA:
* Plan it out from the start.
* Train your staff.
* Do it gradually.
* If incorrect responding begins, return to last prompt level.
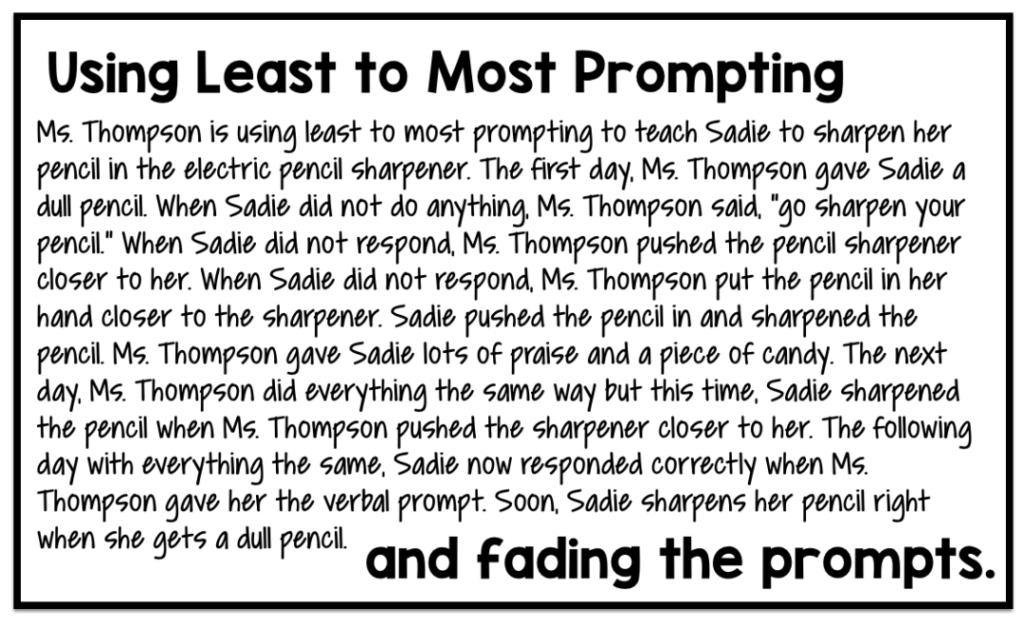
1. Least to Most Prompt Fading
Like we discussed in Monday’s post, least to most prompting involves starting with the least intrusive prompts and moving up in the prompting hierarchy. This can be beneficial because it gives students to the opportunity to be independent and you are only providing as much prompting as needed. This is a strategy we tend to use naturally. When you meet a your friend’s toddler you put out your hand to give a high five. If she doesn’t respond you say, “give high five.” If she still doesn’t respond you move her hand to your hand to give a high five. This is a natural method of prompting. When using this prompt fading technique, ideally the prompts will be somewhat self fading. If you are always starting at the least intrusive prompt, your students will have the opportunity to demonstrate independence. As the student begins to learn the task, he will need less and less prompts to perform it correctly.
Some key tips for using this prompt fading in ABA procedure:
- allow wait time; if you do not provide wait time you may be providing more prompts than needed and taking away the opportunity for the student to respond correctly
- take data; data is key to track progress. Every time you utilize this prompting method – note the level of prompt you used. You want to see that your student is requiring less intrusive prompts as time goes on. This will help avoid prompt dependence.
- use high powered reinforcers; use an item that is actually a reinforcer that your student wants to work for. The sooner he demonstrates the skills, the sooner he gets the reinforcer.
2. Most to Least Prompt Fading
Most to Least prompt fading is another effective method of using prompts. With this method you start the most intrusive prompts and gradually fade to less intrusive prompts. The prompt fading is build right in. However, sometimes people forget that and in their head rename this most to most prompting. The key to errorless learning and using the most intrusive prompts first is that you fade the prompts out. The idea behind most to least prompting is that students will contact reinforcement right away and you will avoid errors and the students developing any incorrect habits.
How to fade prompts in Most to Least Prompting:
- set criteria for changing prompts; once your student hits a particular number of days or sessions or trials at a particular prompt level, fade to the next level; take data to track progress
- once you hit the criteria move to the next type of prompt; refer to our prompt hierarchy or order that is in Monday’s post. Move up the list to less and less intrusive prompts.
- fade magnitude than switch prompt type; before you switch from a gestural to a verbal prompt adjust the magnitude of the prompt. A dramatic point to an object is different that a nod of your head.
Data is critically important for avoiding prompt dependence. You want to set a criteria ahead of time and take data to make sure you are sticking with the criteria. The criteria you set will depend on the student and the task. Maybe you want 3 consecutive days with each prompt level. If you are taking data you can ensure that you are sticking to that schedule. If errors begin occurring, go back a prompt level. The data will guide your implementation of this procedure. If you are fading too quickly, your data will tell you!

Prompt fading in ABA isn’t scary. Plan ahead and make sure you train your staff. This is a group endeavor!

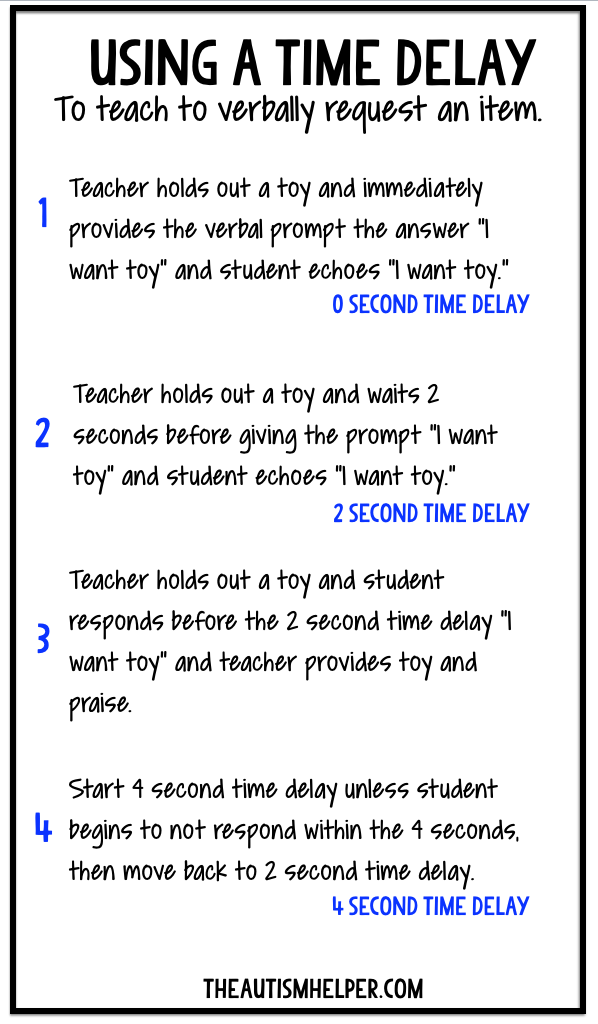
3. Time Delay
One effective way we can fade prompts is using a time delay. A time delay inserts a set amount of time between the natural or teaching cue and our prompt. When utilizing a time delay, start with a zero second (i.e. no) time delay – so it will basically be like errorless teaching. For the first few trials, give the prompt right away so the student knows how to respond. Then after several trials, increase the time delay. For example, you may start with 2 seconds. If the student does not respond within 2 seconds – provide the prompt. If the student responds before the 2 seconds, provide loads of reinforcement. Once the student is successful and responding under the 2 seconds for several trials, increase the time delay. Now wait until 4 seconds to provide the prompt. Continue on. If the student does not respond with the 4 second time delay, move back to the 2 second time delay.
The key to time delay is planning and data. Set the criterion ahead of time. Plan how many sessions you will do at 0 seconds before moving to the first time delay. Determine what the mastery criteria is – how many times do you want the student to respond within the time delay before increasing the time delay length? Take data on this. It can easily and quickly get confusing if you don’t have a data sheet to track what you are doing. Write the plan in simple terms at the top of your data sheet. I like to track prompted correct (PC), prompted incorrect (PI), unprompted correct (UC), and unprompted incorrect (UI) using those abbreviations on my data sheet. If the student responds before the prompt it is counted as unprompted and if it’s after the prompt it is prompted!
There is no magic number of trials or days you should stay within the 0 second or 2 second time delay. It depends on the student’s level of functioning and the difficulty of the task. This is where data majorly comes in to play. If you’ve moved along too quickly, you will know and you can scale back.
Time delay works really well with verbal prompts. Another key component to time delay working successfully is making sure the reinforcement you give for the unprompted responses is better than the reinforcement for prompted responses. So if Johnny responds before the time delay and says the color blue on his own – give him 3 m&ms and praise but if you are using a 2 second time delay and he doesn’t respond and you provide the verbal prompt “bl…” and then he says blue only provide praise. You want the independent responses to be getting more reinforcement so your student is motivated to engage in those responses more!
About The Author
Sasha Long, BCBA, M.A., is the founder and president of The Autism Helper, Inc. She is a board certified behavior analyst and certified special education teacher. After ten years of teaching in a self-contained special education classroom, Sasha now works full time as a consultant, writer, and behavior analyst. Sasha manages and writes The Autism Helper Blog, as a way to share easy to use and ready to implement strategies and ideas. Sasha also travels internationally as a speaker and consultant providing individualized training and feedback to parents, educators, therapists and administrators in the world of autism. She is currently an adjunct professor in the school of Applied Behavior Analysis at The Chicago School of Professional Psychology. Sasha received her undergraduate degree in Special Education from Miami University and has a Masters Degree in Applied Behavior Analysis from The Chicago School of Professional Psychology. Contact Sasha at sasha.theautismhelper@gmail.com.