Autism Awareness Month: DIY Spatial Awareness Button Buddy

sugar aunts 1
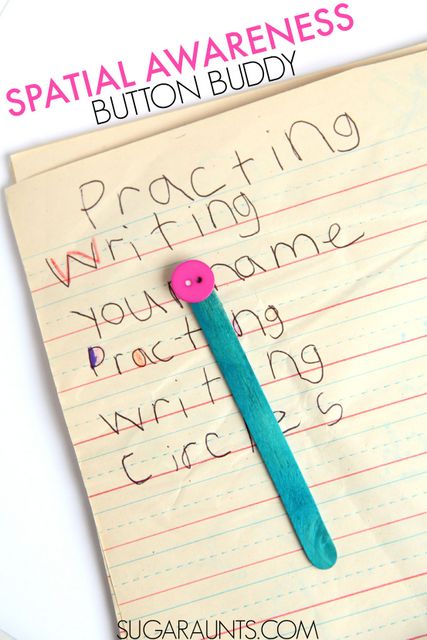
Looking for a simple tool to help improve your student’s handwriting skills? Check out this super easy, DIY solution from Sugar Aunts called the Spatial Awareness Button Buddy!  This tool helps youngsters accurately space letters and words within a sentence using a small Popsicle stick and a button.

Simply glue a button to one end of a Popsicle stick and instruct the student to lay the Button Buddy on its side to indicate where they should place the next letter as shown in the photo below.

sugar aunts 2


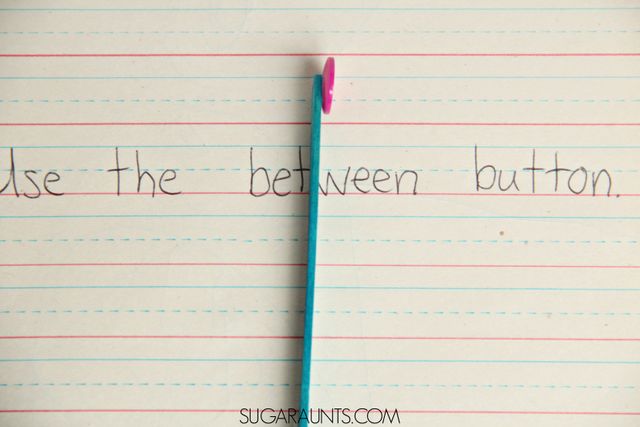
Once the child has completed a word, ask them to lay the Button Buddy flat on their paper, with the button right next to their last letter.  Show them that the space between each word is as long as the width of a button and have them write their next word on the opposite side of their Button Buddy.

Continue on until your little writer has mastered their new spatial awareness skills and can write full sentences without their Button Buddy!

For more spatial awareness activities and ideas, read the full article from Sugar Aunts here.  Otherwise, let us know what other crafts and activities you have come up with to help your students improve their handwriting in the comments section!

Autism Awareness Month: Free Gum Ball Alphabet Matching Activity

Gumball Activity 1Start Autism Awareness Month on a sweet note with this gum ball alphabet matching activity! This free, easy-prep printable from lifeovercs.com and 123 Homeschool 4 Me helps young learners build strong letter recognition skills by asking them to match lowercase letter gumballs with uppercase letter gumball machines. All you have to do is print, cut and play!

Once your student gains mastery and confidence in their letter matching skills, consider asking them to complete the following more advanced tasks:

  • Sort the letters alphabetically
  • Sort vowels from consonants
  • Flip all the cards over for an instant memory letter matching game!

Gumball Activity 2To make sure that your letters last, we recommend printing the activity on cardstock or laminating the letters for longer use.

You can download this free printable here, but don’t forget to let us know in what other ways you and your students utilized this alphabet activity in the comments section!

Do-It-Yourself Fall Crafts: Paper Plate Owls and Apple Sensory Cards

Crisp sunny days and cool nights mean that Fall is really on its way. The changing weather is a great opportunity to work on some seasonal activities with your kids. We found two wonderful little do-it-yourself fall craft projects for parents and teachers to engage in with their kids this season.

Dr. Carrie Wells over at Huppie Mama came up with an adorable Paper Plate Owl project that requires no more than just a few easy-to-find materials:

  • White paper plates
  • Scraps of construction paper
  • Glue
  • Markers, crayons, or paint

…and of course, some creativity!

Click here for the full DIY Paper Plate Owl project by Huppie Mama, and let us know how creative you and your kids get with these owls for Fall!

Samantha at Stir the Wonder came up with an apple-themed project that introduces various tactile sensations to young kids. Colored in red, yellow, and green, these Apple Sensory Cards can be used to incorporate a variety of textures, such as bumpy, smooth, rough, and soft, all with the following materials:

Click here for the full DIY Apple Sensory Cards project by Stir the Wonder, and share with us what kinds of textures you come up with for your kids!

Cut-and-Fold Paper Craft for Autism Awareness

Share the awareness for Autism in the classroom, office, or room at home with this adorable cut-and-fold “I Love Someone with Autism” paper dog.  We came across this easy-to-assemble template and thought we’d share it with all of you to display in the spirit of Autism Awareness Month.

Holding a heart-shaped sign with the words “I Love Someone with Autism,” and with a rainbow autism awareness ribbon on his right ear, this cut-and-fold toy dog can be a wonderful display on a desk or side table in your classroom, office, or room.

Fold and Cut Dog 2

Some other great ways to incorporate Autism Awareness into this template can be to (before folding and gluing):

  • Draw and color in puzzle pieces on the dog template
  • Personalize it as a gift to someone special by writing a message
  • Coloring in the dog template with your child

Fold and Cut Dog 1

Don’t forget to download your free template here and let us know how you found other ways to make this activity more fun with you and your child.

Visual Schedule to Improve Independent Play Skills in Children with Autism

Parents, caregivers, therapists and teachers alike work so hard to teach a variety of play skills but what happens when your child or student doesn’t make that leap from facilitated play to independent play? Independent play is such an important skill that will allow him or her to better connect with their peers, build friendships, expand problem-solving skills and structure downtime.  A successful transition from demonstrating play skills with adult support to playing independently can be impacted by a myriad of variables.

Some of my students struggle with independent play because it is difficult to move from a thick schedule of reinforcement of 1:1 adult attention to a thinner one of just having an adult “check in” once in a while.  Other learners have impairments impacting executive function, specifically the organization and sequencing of steps for meaningful and reinforcing play as well as on-task behavior, task completion and working memory. Additionally, in some cases the skill of independent play is elusive because teachers struggle to find ways to fade out prompts or to successfully thin out the schedule of reinforcement.

Below is the visual schedule with data sheets for measuring acquisition and progress that I have created.  I have found it useful with learners with very different skill sets and abilities.  Click here for a comprehensive Task Analysis on teaching independent play using a visual schedule.

Keep in mind that this is for learners that:

  • Have successfully acquired a varied repertoire of play skills
  • Do not require visual schedules that break down every step of the play
  • Are able to complete activities with delayed reinforcement

In order to prepare this for use with the learner:

  • Set up a toy organizational system that has toys bins
  • Print the materials and laminate the schedule strip and the cut out shapes.
  • Attach Velcro dots to the bins, schedule strip and shapes and to the work surface if you like
  • Identify activities that are suitable for this schedule

Remember that any open-ended activities like building blocks or coloring can be turned into close-ended activities by limiting the number of pieces or by teaching the learner to use a timer.

As you would when teaching any schedule, use a most-to-least prompting strategy, only use verbal instruction for the initial direction or S(e.g. “Go play.”), and prompt only from behind and out of view.

The schedule I have been using has a smiley face at the end of the schedule indicating a “free choice” time which all of my students understand.  However, if you are using this with a learner that requires a visual reminder of what they are working for, you could easily adapt this by putting a picture of the reward in the place of the smiley face.  Time to play!

*Don’t forget to download your free visual schedule and data sheets here!

A sweet card for someone you love to say, Happy Valentine’s Day!

What’s better than receiving a box of chocolates on Valentine’s Day? A card from your child or student that celebrates the goodness of love and caring, of course! We’re delighted to help you spread the love on this special day. Here are some simple Valentine’s Day Coloring Cards for you to print out, color, and adorn with a message to surprise Mom, Dad, a sibling or teacher. Click here to view the cards in full and get to crafting.

Coloring_Card_MomColoring_Card_DadColoring_Card_Friend


DIY Valentine’s Day File Folder Game

With yet another winter storm upon us, it’s easy to say that none of us here at Different Roads feels like stepping outside! And what better way to stay warm inside than with a do-it-yourself learning game? In keeping up with last week’s DIY theme and to prepare for Valentine’s Day, we’ve decided to share with you a DIY hearts-themed file folder game we found for you to create and play with your child. Just click here to download your free Hearts & Numbers File Folder Game!

What we love about this set of cut-out hearts is that it allows you to customize your file folder game at your own creative liberty. Here is what we’ve come up with for a fun and interactive Valentine’s Day.

Valentine's Day File Folder Game

Helpful hint: You can print out your dotted and numbered hearts in different-colored card stock for added charm, or allow your child to color in the hearts before gluing them down.

File Folder 2

If you don’t have a laminator, you can seal your hearts in clear tape before cutting them out. It looks just as great and gives added protection!

File Folder 3

Here, we created a mini pocket on the inside cover of our file folder to store our numbered hearts. This a great way to use up any remaining card stock you may have left over.

Let us know how you’re being creative with this lovely Hearts and Numbers File Folder Game. Or if you’re doing something else to spread the love this Valentine’s Day with your child, we’ve love to know as well!

Free Downloadable Token Board

I don’t know if it’s all of this talk about extreme temperatures, the polar vortex phenomenon or just an early itch for spring to arrive. Whatever it is, a current student of mine became interested in picnics and in turn I was inspired to find a new way to motivate him through challenging homework sessions in the evenings.

Picnic Token BoardI decided when creating this token economy to print an abundance of items for the picnic blanket token board. I did this because the particular student I had in mind when making this was struggling to even approach the homework table, let alone begin his homework. So, I thought that having an opportunity to talk about which tokens we would bring on the “picnic” as well as which back up reinforcer he would earn in exchange for the tokens before starting to earn them would motivate him to come to the homework table more easily. In fact, this allowed for a softer transition away from preferred activities to the homework table. Depending on the student you could use five tokens or ten. We’ve assembled two printable pages of these tokens and token board for you to download here. See the steps for assembly below:

  1. Picnic Tokens ButtonPrint the files using a color printer and cut out each image.
  2. Laminate them separately and then cut them out of the lamination sheets.
  3. Attach the loop side of Velcro dots to the individual images and either 5 or 10 Velcro dots with the hook side onto the picnic blanket depending on which number is most appropriate for your student.
  4. If the learner needs a visual reminder of what they are working for (backup reinforcer) you could easily print up child specific reinforcers to be attached to the picnic basket as a reminder.
  5. If your learner does not require a visual reminder of the backup reinforcer you could easily adhere the laminated picnic basket to the backside of the picnic basket leaving an opening at the top and use it as a storage pocket for any tokens you aren’t using.

For more free autism resources, make sure to click here and sign up for our mailing list! 

Wait, What Are We Talking About?

I typically work with very young learners in Early Intervention but there was a time I was working with older children, which necessitated work on conversation skills and topic maintenance. With the start of a new academic year and changes to my caseload I am currently finding myself with students who again need some assistance in this area.  Children with autism spectrum disorders often struggle in conversations because of limited or restricted interests, attending issues, difficulty determining what is relevant or salient to the topic and might also struggle with the rapid transitions necessary to shift between speaker and listener.  This change in my caseload has meant that I’ve found myself digging into old files and unearthing some ancient DIY efforts of mine that I had used in the past.  What I came across that I wanted to share was a visual support that I had used in small groups to facilitate a variety of skills.  It’s something I called Chit Chat and it helped to cue the students in shifting from speaker to listener while maintaining a balance in the conversation with turn taking and reciprocity as well as staying on topic.

The idea was that we would all sit down for a “chat” and initially I would go first in order to model how the board was used rather than providing explicit instruction until the group could use the board on their own and I could fade myself out of the conversation.  The first speaker would choose a token corresponding to a topic of interest, make a statement relevant to the topic chosen and then pass the token to a friend.  The token would provide a prompt for the speaker to maintain the chosen topic as well as cue the rest of the group to visually reference the child whose turn it is to be speaker.  Depending on the level of the group I would individualize the number of conversational exchanges on one topic required before bridging to a new topic. The group I was working with at the time was able to talk about more general topics but this could be individualized to more specific topics depending on the group of students you are working with.

I’m excited embarking upon a new academic year with all it’s unique challenges and successes and am happy to dust off Chit Chat and give it another whirl this year with all new students.  I would be curious to hear from other educators and therapists what tools they’ve created that they find themselves going back to year after year.  You might be surprised what you find at the bottom of your file cabinet!

Also, check out this great link I stumbled across from POPARD Provincial Outreach Program for Autism and Related Disorders in British Columbia, Canada.

https://www.autismoutreach.ca/elearning/social-skills/conversation-and-topic-maintenance

Participate in Our “Design A Ribbon Project” for Autism Awareness Month

Join Different Roads to Learning in commemorating Autism Awareness Month by designing your own Autism Awareness Ribbon.  We hope you’ll join us in raising awareness this April and shedding your light on autism through Different Roads to Learning’s Ribbon Project.

Download the blank template and decorate it with pencils, crayons, markers, photos, graphics – whatever strikes your fancy! Print out a bunch and have your students color them in or pass them out to Aunts, Uncles, Grandparents and have them participate as well.

Different Roads will be gathering all of your designs and displaying them in photo galleries on our Blog and Facebook Fan Page.  You can help us raise awareness about autism & our Autism Awareness Ribbon Project by spreading the word via email, Facebook, and Twitter.

When you have your Ribbon decorated, scan a copy and email it to info@difflearn.com or mail it to us at:

Different Roads to Learning
37 East 18th Street, 10th Floor
New York, NY 10003

We hope you’ll join us in raising awareness and shedding a personal light on autism through our Autism Awareness Ribbon Project.

Here’s how to design & submit your own Autism Awareness Ribbon artwork:

1) Click on the ribbon image above or on the outlined ribbon image on the top right sidebar of our Blog’s homepage to access our published Ribbon Template. You can also retrieve our Ribbon Template in the tab called “Design Ribbon Project” at the top of our Facebook Fan Page .

2) Download the Autism Awareness Month Ribbon template on our Blog or Facebook Fan Page and print out as many copies as you need.

3) After decorating your completed Autism Awareness Month Ribbon masterpiece, submit your design by emailing it to info@difflearn.com or mailing it to: Different Roads to Learning / 37 East 18th Street, 10th Floor / New York, NY 10003

And be sure to check out all of your beautiful designs on display in our Ribbon Galleries on our Blog & Facebook Fan Page!