Tip of the Week: Avoid Prompt Dependence When Teaching New Skills

“She won’t say hi unless I say ‘Say Hello.’” “He will only wash his hands if I put his hand on the knob to turn on the water.” “He won’t use his fork until I put it in his hand.”

I hear statements like this all the time from both parents and providers working with learners what autism. What they are describing is “prompt dependence,” which is when a learner requires a prompt from a teacher or parent in order to complete a task. So how do you avoid prompt dependence with your own learners?

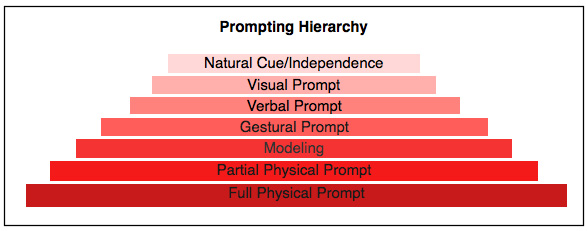
Let’s start with the prompt itself. There are many different ways to prompt which can be divided into levels by how intrusive the prompt is. Below is a sample of a prompt hierarchy, with the least intrusive prompt at the top and the most intrusive prompt at the bottom. Your goal is to quickly move through the prompt levels to move your learner to independence.

Prompting Hierarchy

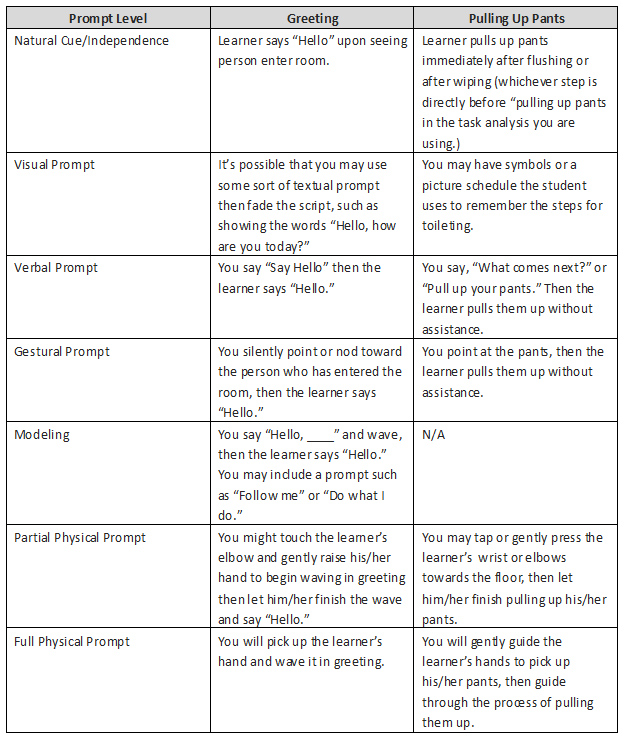
Now let’s look at two different examples to show these prompt levels. In the first example, the goal is for the learner to greet a person who walks into the room. In the second example, the goal is for the learner to pull up his/her pants after using the bathroom as a part of a toileting routine.

Prompt Chart

Research shows that least-to-most prompting increases potential for errors and slows down rate of acquisition for new skills. Therefore, most-to-least prompting is preferred for teaching new skills. This means that you would start at a full physical prompt, then move your way up the prompt heirarchy until your learner achieves independence with the task.

In the past, when working with discrete trials, it has been common practice to have a learner master a skill at a certain prompt level, then move to a less intrusive prompt and have the learner master the skill at that prompt level, steadily moving towards independence. This can actually encourage prompt dependence because the learner remains on the same prompt level for too long.

Instead, you should try to quickly move up the prompt hierarchy in a way that makes sense for the skill you are trying to teach. Below are some tips to help you help your learners achieve independence.

  • Follow the rule of three: Whether you are teaching with discrete trials or in the natural environment, once your learner has successfully responded to a demand three times consecutively, move to a less intrusive prompt.
  • If you are taking data, make a notation of what prompt level you are using at each step. (And remember, that only independent responses should be counted towards the learner’s percentage of correct responses.)
  • At the end of a session or group of trials, note what prompt level you were at by the end of the session. Then start at that level during the next session.
  • If your learner does not respond correctly when you move to a less intrusive prompt, then move back to the most recent prompt level. Once they respond again correctly at that prompt level three times consecutively, move again to a less restrictive prompt.
  • Remember that verbal prompts are very difficult to fade. Though they are less instrusive, you should avoid using them when possible.
  • You can pair prompts and then fade out the more intrusive prompts. For example, with the sample of pulling up pants described above, you can pair a visual prompt with a gestural prompt by showing the symbol for pulling up pants while pointing at the pants. Over time, you stop using the symbol and just use the gestural prompt. The gestural prompt can be faded by moving your point further and further away from the pants.
  • Write down what the prompt levels will look like for the specific task you are teaching. This way you will be fully prepared to quickly move your learner towards independence.
  • Differentiate your reinforcement! If you move to a less intrusive prompt and the learner responds correctly, then you should immediately provide a stronger reinforcer than you did for previous responses. If a learner spontaneously responds without a prompt, you should do what I call “throwing them a party” by combining reinforcers (such as tickles and high fives) or providing a highly desirable reinforcer.

Prompting can be very difficult to do well, but following these tips should help set your learner on the path to independence.

Tip of the Week: Always Be Pairing

Yesterday, we introduced you to Sam Blanco, BCBA-extraordinaire and Different Roads’ wonderful new consultant. Today, we’re thrilled to commence her new weekly segment, the “Tip of the Week.” We’re sure you’ll find them to be as interesting and insightful as we do.

TeacherStudentHighFiveAlways Be Pairing

If you are familiar with ABA, you have probably heard of the term pairing. The idea behind pairing is that you will establish and maintain a positive relationship with the child by pairing yourself with preferred items or activities. Pairing is important not only in establishing a relationship with a learner; but also in maintaining the relationship, preventing boredom, and increasing motivation throughout your relationship with the child.

Below we address four common misconceptions with pairing.

Common misconception #1: Pairing only takes place when you are building a relationship with the child.

Many therapists I’ve supervised tell me that they pair for the first 1-4 weeks, then start teaching. But pairing shouldn’t end there (nor should it necessarily take so long as we’ll see with common misconception 2.)

Before each session, you should engage in “pre-session” pairing. This means that you are providing free reinforcers without placing demands. For early learners you might start off a session with blowing bubbles or playing with a parachute. For older learners you might start off a session with a game or sharing a book the child enjoys. Usually, it’s a good idea to present the learner with options during pre-session pairing. Involving choice frequently increases motivation, and it also increases the likelihood of delivering a more highly reinforcing item.

Some people feel that pairing every session eats up valuable instructional time. However, pre-session pairing increases motivation and cuts down on maladaptive behavior, which actually increases the amount and the quality of your instructional time for a given session.

Common misconception #2: Pairing takes a long time, and a provider or teacher should not start placing demands until the pairing process is complete.

In some cases, pairing may take a long time. However, in many cases, you are able to start placing demands during the first session. This does not mean that you’ll necessarily start doing discrete trials on the first day, but you can begin placing simple demands to build instructional control while you are pairing. It’s helpful for gaining instructional control to incrementally increase the number of demands placed across sessions, while always starting with a pre-session pairing session.

Unfortunately, pairing is not an activity that can be measured, and it’s important to recognize that the pairing process is never complete.

Common misconception #3: Pairing should involve sensory toys because all children with autism are highly motivated by such toys.

For some learners, sensory toys are highly motivating. However, a common error is using the same pre-session pairing with every learner. What you believe is reinforcing in general may not be reinforcing for your learner in particular. If the learner is not engaging with the item, ignoring it, putting it down, or displaying maladaptive behaviors when the item is presented; then the item is not reinforcing.

Another consideration is that big aspect of pairing is that the learner associates these motivating items and activities with you. While it is beneficial to be the purveyor of fun sensory items; it may be even more beneficial to engage in activities with the learner, such as cause and effect toys or games or physical activity that requires your involvement.

Common misconception #4: A learner will always be motivated by the same items.

Several times when a provider calls me to come in and assist with behavior problems, I discover that there is not enough novelty within their pairing sessions. A learner may love a marble run one session (which happens to be one of my all-time favorite toys) then have no interest the next session. Or, what I see much more often, is that the learner loves the marble run for two months, then suddenly has no interest in it. The provider or teacher is uncertain about what happened and depended too heavily on that reinforcer. Then, without a powerful reinforcer to use throughout the session, the learner displays a drop in motivation and sometimes an increase in maladaptive behaviors.

There’s a word for this: satiation. Learners display a wide range of satiation levels. Some learners you work with may satiate on reinforcers within minutes, while other may prefer to see the same items over and over from session to session. A learner’s satiation can vary based on many different variables, so you should be prepared to address it.

One way to address this is to choose not to bring the same reinforcers to each session. This way, if a battery dies, you forget to bring a favorite toy, or something breaks you have not set yourself and your learner up for failure. A second way to address satiation is to remove the item while the child is still motivated to engage with it, instead of waiting until he/she has lost interest before introducing other choices.           

When pairing is consistent, specific to the child’s interests, and involves a variety of items and activities learners will maintain motivation and you will be more easily able to maintain instructional control.

Pick of the Week: Parachute Play

DRG_350_Parachute_PlayAs Fall creeps up and school looms near, we thought this week’s pick should embody the carefree and playful aspects of summer. Within a few short days, our regular school-day routines will start up again and the memories of sand squishing between our toes and summer BBQs will fade. So celebrate these final days with one of the most simple yet fun games around – the Parachute! This week, save 15% on our Parachute Play by entering the Promo Code BLOGPP13 at checkout. It measures 6 feet with 6 handles so you can play one-on-one or involve the whole family.

And if you’re feeling like you should be focusing on school readiness and not play, well the Parachute can help there too! Here’s a post by our brilliant friend Sam Blanco on her Teachthrough Blog about all of the educational uses of the simple yet wondrous parachute.

Age level: Preschool, Early Elementary
Description: I still remember how excited I would be when the teacher brought out a parachute during elementary school. Even now, I can’t exactly identify what it is about a parachute that draws children in, but I have found that it almost always works even for my most difficult to motivate students.

Skills & Modifications: There are many things you can do with a parachute. I’ve listed a few below, but if you have used it in other ways, please leave a comment explaining the activity!

  • Manding (Requesting) – I frequently use a parachute to have my early learners mand for actions. For example, I’ll have the learner lie down on the parachute, then they have to mand for me to “pick up the handle,” “swing,” ready set “go,” or “stop.” I also use the parachute (or a blanket) to teach early learners with autism how to request a parent’s attention. I will have the parent hide behind the parachute, and when the child says “Mommy” or “Daddy” the parent will drop the parachute so he/she is immediately visible and give the child lots of attention in the form of tickles, kisses, verbal praise, etc.
  • Comparisons/Adjectives – To help students understand the concept of big and little, I will have the children stand around the sides of the parachute holding onto it with their hands. I will place an object on the parachute, and we will bounce the parachute up and down to try to get the object to fall into the hole in the center of the parachute. Some objects will fall, but some will be too big to fall into the hole. I will ask the students why the object fell or did not fall.
  • Sorting – I will place several colorful objects on the parachute. We will then bounce the parachute up and down playfully. After a 30 seconds to a minute, we will put the parachute back on the floor, and the student will have to move each object onto a panel of the parachute that matches in color.
  • Identifying body parts – Because the parachute has a hole in the middle, I will sometimes use it for identifying body parts. The learner can lie down on the floor. Then I will put the parachute on top of them. I’ll pretend I’m looking for them (for example, “Where is Charlie?”) Then I’ll position the parachute so that one part (such as their hand or their nose) is clearly visible. I’ll lightly touch it and say “What is that?” and have the student label nose or hand or elbow, etc. Once the learner has an idea of the game, I may let them initiate it, or have them say “Find my nose” and I’ll place the parachute so their nose is visible.
  • Song Fill-ins – I like to sing songs while shaking or spinning the parachute. For students with autism or other language delays who struggle with this skill, the parachute can be a great motivator to help with song fill-ins and other intraverbal skills. I will sing the song while shaking or spinning the parachute, and I’ll stop singing AND moving the parachute when I want the child to fill in a word. As soon as the child fills in the word, I will begin singing and moving the parachute again. For many students, this is more motivating than a high five or saying “good job.”
  • Quick Responding – If you are working with learners with autism, the absence of quick responding is sometimes a serious barrier to learning. I have found that using the parachute isa  good way to motivate the student to respond quickly when presented with at ask by using it as described above with the song fill-ins. Once I am getting quick responding with the parachute, I quickly begin to work on generalizing the skill to other environments (such as the table or during a floor activity.)

Pros: There is a wide variety of activities that you can do with a parachute. As mentioned before, my experience has been that it is a great tool for motivating students who are difficult to engage. The parachute is also fantastic as a reinforcer or to use during a break. It is fun for students to play hide-and-seek with it, lie on the floor and have you lift the parachute high into the air then bring it down on top of them, or spin it in a circle. One final pro is that, depending on the size of the parachute, you can do these activities indoors. I have a parachute that is six feet in diameter, which is perfect for indoor activities with preschool and early elementary learners.

Cons: You have to think carefully about the environment in which you will be using the parachute and choose the appropriate size. Many parachute activities also require more than two people, so if you are working 1:1 with students, you should prepare ahead of time to ensure that a sibling or parent will be available to participate in the activity with you.

Remember, enter the promo code BLOGPP13 at checkout to save 15% on our Parachute Play this week only.

***This expires September 3, 2013 at 11:59 pm EST. Not compatible with any other offer. Be sure there are no spaces in the promo code at check out!

Pick of the Week: MotivAider

It’s the best tool available for people of all ages to stay focused and change behavior and habits quickly, easily and privately. The MotivAider is one of our bestsellers for behavior modification of all sorts. The MotivAider is a simple electronic device that vibrates at timed intervals to provide an individual with a private prompt to engage in a specific behavior. You can program it to vibrate on a variable or fixed schedule at different durations and intensity. There’s a wonderful article and review on the uses of the MotivAider by our friend Jenn over at Toys are Tools that explores how some students and teachers are using the MotivAider in their classrooms.

This week only, you can save 15% on the MotivAider by entering the Promo Code BLOGMTVT at checkout. If you’ve always wondered just what the MotivAider can accomplish, here’s your chance to try it at a great discount.


*Offer expires on July 17, 2012 at 11:59 pm EST. Not compatible with any other offer. Be sure there are no spaces after the Promo Code when you enter it at checkout.


Pick of the Week: Clear Schedule with Token Strip

This new Clear Schedule with Token Strip is ingenious! It combines the value of  a schedule board with a token economy system. You can keep learners on task with either images or actual objects as they move along their picture or written schedule. The clear pockets and Velcro strips can be used on both sides so planning and transitions are easy.

This week only, save 15% on the Clear Schedule with Token Strip by entering the Promo Code BLOGCST2 at checkout.

*Offer expires on May 15, 2012 at 11:59 pm EST. Not compatible with any other offer. Be sure there are no spaces after the Promo Code when you enter it at checkout.


Fostering Prosocial Behavior: A Guest Post by Terese Dana of TD Social Skills

To get along with others successfully, people must exhibit prosocial behavior. Susan Fiske, a social psychologist, defines this as behavior intended to benefit others. It includes behaviors such as, helping, comforting, sharing, cooperating, reassuring, defending and showing concern. Prosocial behavior promotes positive interactions and friendships, and exhibiting these behaviors is considered part of the social norm.  Since prosocial behavior is expected, deficits in this area can lead to unfulfilled attempts at developing friendships.

Many children on the autism spectrum can spend much of their time intensely focusing on their own self-interests.  To enhance their social experiences they will need to learn how to include the interests and needs of others into their daily interactions. To increase prosocial behavior, complex cognitive and emotional competencies, along with specific social skills need to be developed.

Studies have shown video modeling to be an effective tool to teach many different skills and behaviors. Using video modeling DVDs that incorporate perspective taking can help children to understand WHY acting in ways that include the needs, concerns, and interests of others can lead to better friendships.  By viewing social interactions from multiple perspectives, children learn, through modeling, what they can do differently to get better outcomes when engaged in social exchanges.

Why does video modeling work?

  • Most children are highly motivated, interested and thus attentive to video
  • Most enjoy repeat viewings
  • It gives the student the opportunity to observe, discuss, imitate and learn skills and behaviors from peers
  • It is easier to implement and has been shown to be more effective then using live models
  • Many students on the spectrum are visual learners

“ I think in pictures. I do not think in language.  All my thoughts are like videotapes running in my imagination.  Pictures are my first language and words are my second language.”  – Temple Grandin, Ph.D, Teaching Tips for Children and Adults with Autism

Increasing social competency provides children with opportunities to interact with peers more successfully.  Video modeling has been shown to be a particularly effective way for children on the autism spectrum to not only gain skills but to generalize those skills as well.

Terese Dana, BCaBA, is a behavior analyst and social skills instructor who has been helping students find solutions to social, emotional, behavioral and organizational challenges since 1988. Ms. Dana consults for both school and home programs. She collaborated with Madison Elementary School, to establish the Madison Educational Center for Children (MECC) in Madison, NH.Ms. Dana is the creator of the Fitting In and Having Fun Video Modeling Program.  The DVD series includes: Fitting In and Having Fun, Moving On to Middle School and Confident and In Control. She has also created the File Factor Emotional Empowerment System, a tool that helps children regulate their behavior by teaching them how to identify, understand, express and control their emotions.  She is the author of the book, The File Factor; Filing Away Disappointment.

Ms. Dana has appeared on national television, in the New York Times and in The Autism Sourcebook, Everything You Need to Know About Diagnosis, Treatment, Coping and Healing.  She lectures across the country and is the autism consultant for Didi Lightful, a children’s television show currently in production.  Ms. Dana also serves as board President of The Laura Foundation for Autism and Epilepsy and in that role is creating the Laura Adaptive Sports and Recreation Center in Madison, NH.

Tell Me About It! Sweepstakes – Win A Free Copy of Our New App!

 Different Roads to Learning is thrilled to offer you the chance to win a free copy of our latest iPhone/iPad App for teaching language to students with Autism or speech and language delays: Tell Me About It! Learning Language by Receptive Function, Feature & Category. This special offer ends on February 17, 2012 at 11:59 PM EST.

 Tell Me About It! teaches the label, category, function, and features of more than 235 language targets over 6 levels of incremental difficulty with over 1000 unique testable attributes. The presentation of each language target conforms to an Applied Behavior Analysis (ABA) discrete trial program, with reinforcement provided by a token economy system. Once the user collects the given number of tokens, they are rewarded with an adorable 5-10 second animation clip of the token character.

 Tell Me About It! provides a self-contained discrete trial program that error corrects and provides direct reinforcement to the student while collecting and synthesizing data for up to 10 students. There is a Student Report Card in the format of a data sheet that displays data for each student, with an option to email the results.

For complete details on our sweepstakes and to enter, click here

Currently, our new app Tell Me About It!is being sold in the iTunes store for $9.99. You have the chance to win it for free by entering our Sweepstakes!

 To learn more about Tell Me About It!, visit the store in iTunes by clicking here! 


Individualized Token Economy Systems – Strategies for Teaching Students with ASD by Autism Partnership

Individualized Token Economy Systems

 At Autism Partnership we have found the development and implementation of individualized token economy systems to be a powerful tool in accelerating progress for our students. Token economies have been shown to be an extremely effective contingency management system for a variety of populations. Initially, Ted Allyon used token economies to provide consequences to hospitalized mentally ill residents. The procedure proved to be extremely effective and quickly token systems were utilized with other populations exhibiting challenging behavior problems, including “delinquent” adolescents (Montrose Wolf) and mentally retarded adults (Nathrin Azrin).

Today, token economies are used to address a variety of behavioral concerns including those of children with Attention Deficit Disorder and Autism Spectrum Disorder as well as typically developing children. Token economies have been so widely recognized as effective and efficient behavior management strategies to such a degree that they are routinely being employed in general education classrooms throughout the world. (Star Charts, Table Points, Marble Jar).

Tokens are symbols (e.g., points, coins, stickers, ticks or check marks, toy parts, etc), which are delivered immediately after a target response and are exchanged later for an item or activity of preference. Tokens therefore symbolize access to other preferred items or experiences, technically referred to as “generalized reinforcement”. Initially the tokens in and of themselves are not rewarding but once the student understands that tokens can be “exchanged” for preferred activities, their value is established. A daily life example of this process would be our use of money which allows us to purchase desired items or experiences. Creative systems often use motivating tokens such as pictures of favorite cartoon characters, athletes or musicians. Pictures of the target behavior can be used as the symbol as well. The tokens are clearly displayed, allowing the student to always see how many they have earned, and how many more they need to earn until reinforcement will be delivered.

This is part of a guest series by Autism Partnership founders Ron Leaf, John McEachin and Mitchell Taubmann. Established in 1994, Autism Partnership is one of the nation’s premier agencies dedicated to providing intensive behavior intervention for children with autism and their families. They offer a comprehensive program and a variety of proven services, including in-home, in-classroom and one-on-one, as well as lectures and workshops. All programs are handled by expert staff and tailored to each individual child, family and caregiver, with the goal of helping that child achieve their best life. For more information, visit www.autismpartnership.com.

Reinforcement Development – Strategies for Teaching Students with ASD by Autism Partnership

Reinforcement Development

 When discussing the importance of reinforcement often parents and teachers alike will comment that reinforcement doesn’t work because there is nothing that the child finds to be reinforcing.   Often this is not accurate: there are lots of potential reinforcers but they are receiving them for “free.”  That is they are not earned or technically they are not contingent.  They watch TV, play on the computer or go on an outing without them being earned.  If they were made to be contingent upon behavior they would indeed change behaviors.  Moreover, there are often many things that could be reinforcers but if the student doesn’t know how to play with, say, the toy, therefore it too is not a reinforcer. 

Identifying reinforcers often requires creativity.  By “definition” children with ASD enjoy self-stimulation.  Perhaps their self-stimulation can be used as a reinforcer.  For example, you may provide them the opportunity to line up objects, sift sand or perseverate on a topic as a reinforcer.  As another potential reinforcer you can bother them by making demands and intruding upon their space and then leaving them alone can serve as the reinforcer.

Naturally, if you were to use self-stimulation or escape as a reinforcer, you would want to use this as a means to develop other reinforcers.  For example, when engaging in self-stimulation you may associate it with music so that music eventually becomes a reinforcer.  Association can also be used with escape.  For example,  when they escape a demand,  direct them to play on the computer thereby making the computer a reinforcer.

Whether a student has established reinforcers or if truly there is nothing that is reinforcing, it is necessary to develop reinforcers.  But it takes creativity and being highly systematic!  The following are a few ideas on how to develop reinforcers:


  •  Sometimes reinforcement development can be as simple as exposing the child to potential reinforcers. 
  •  Giving free access to potential reinforcers can also create new reinforcers. 
  • An effective way to develop reinforcers is to associate potential reinforcers with established reinforcers.
  •  The “packaging” of the reinforcer can is another strategy to develop reinforcers.  Often you can “sell” the reinforcer by being enthusiastic and playful. 
  • Assessing what the student likes and then creating reinforcers based upon interests can create reinforcers. 

Giving students choices can be effective in the development of the reinforcement.  Simply giving a student a choice of which of two toys he would like to play with can have the effect of making the selected toy as a reinforcer. 

This is part of a guest series by Autism Partnership founders Ron Leaf, John McEachin and Mitchell Taubmann. Established in 1994, Autism Partnership is one of the nation’s premier agencies dedicated to providing intensive behavior intervention for children with autism and their families. They offer a comprehensive program and a variety of proven services, including in-home, in-classroom and one-on-one, as well as lectures and workshops. All programs are handled by expert staff and tailored to each individual child, family and caregiver, with the goal of helping that child achieve their best life. For more information, visit www.autismpartnership.com.

Teaching Interactions – Strategies for Teaching Students with ASD by Autism Partnership

Teaching Interactions

 Teaching Interactions (TI’s) are another instructional format that can be invaluable in teaching children skills.  This instructional technique was developed at the University of Kansas as part of the Teaching Family Model for delinquent youth.  TI’s have several benefits as it allows for structured training of more complex, often sophisticated skills in a highly natural, interpersonal, expanded conversational format.  TI’s are designed to teach complex skills (e.g., social skills, problem solving, etc.).  They utilize shaping and reinforcement to teach a skill and rely on a task analysis format.  The teaching style is typically conversational and flexible in nature, providing the student multiple opportunities to participate in the teaching process.  Although flexible, the technique approaches teaching skills systematically, and requires planning for generalization.  Following are the 6 steps of a TI and both guidelines and considerations when utilizing this teaching technique.


  • Initiation & Labeling
  • Rationale
  • Demonstration
  • Practice
  • Feedback
  • Consequences

This is part of a guest series by Autism Partnership founders Ron Leaf, John McEachin and Mitchell Taubmann. Established in 1994, Autism Partnership is one of the nation’s premier agencies dedicated to providing intensive behavior intervention for children with autism and their families. They offer a comprehensive program and a variety of proven services, including in-home, in-classroom and one-on-one, as well as lectures and workshops. All programs are handled by expert staff and tailored to each individual child, family and caregiver, with the goal of helping that child achieve their best life. For more information, visit www.autismpartnership.com.