
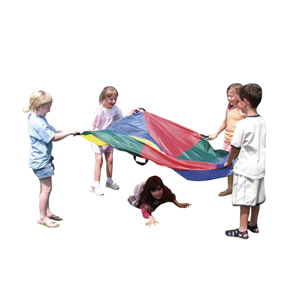
Pick of the Week: Parachute Play

DRG_350_Parachute_PlayAs Fall creeps up and school looms near, we thought this week’s pick should embody the carefree and playful aspects of summer. Within a few short days, our regular school-day routines will start up again and the memories of sand squishing between our toes and summer BBQs will fade. So celebrate these final days with one of the most simple yet fun games around – the Parachute! This week, save 15% on our Parachute Play by entering the Promo Code BLOGPP13 at checkout. It measures 6 feet with 6 handles so you can play one-on-one or involve the whole family.

And if you’re feeling like you should be focusing on school readiness and not play, well the Parachute can help there too! Here’s a post by our brilliant friend Sam Blanco on her Teachthrough Blog about all of the educational uses of the simple yet wondrous parachute.

Age level: Preschool, Early Elementary
Description: I still remember how excited I would be when the teacher brought out a parachute during elementary school. Even now, I can’t exactly identify what it is about a parachute that draws children in, but I have found that it almost always works even for my most difficult to motivate students.

Skills & Modifications: There are many things you can do with a parachute. I’ve listed a few below, but if you have used it in other ways, please leave a comment explaining the activity!

  • Manding (Requesting) – I frequently use a parachute to have my early learners mand for actions. For example, I’ll have the learner lie down on the parachute, then they have to mand for me to “pick up the handle,” “swing,” ready set “go,” or “stop.” I also use the parachute (or a blanket) to teach early learners with autism how to request a parent’s attention. I will have the parent hide behind the parachute, and when the child says “Mommy” or “Daddy” the parent will drop the parachute so he/she is immediately visible and give the child lots of attention in the form of tickles, kisses, verbal praise, etc.
  • Comparisons/Adjectives – To help students understand the concept of big and little, I will have the children stand around the sides of the parachute holding onto it with their hands. I will place an object on the parachute, and we will bounce the parachute up and down to try to get the object to fall into the hole in the center of the parachute. Some objects will fall, but some will be too big to fall into the hole. I will ask the students why the object fell or did not fall.
  • Sorting – I will place several colorful objects on the parachute. We will then bounce the parachute up and down playfully. After a 30 seconds to a minute, we will put the parachute back on the floor, and the student will have to move each object onto a panel of the parachute that matches in color.
  • Identifying body parts – Because the parachute has a hole in the middle, I will sometimes use it for identifying body parts. The learner can lie down on the floor. Then I will put the parachute on top of them. I’ll pretend I’m looking for them (for example, “Where is Charlie?”) Then I’ll position the parachute so that one part (such as their hand or their nose) is clearly visible. I’ll lightly touch it and say “What is that?” and have the student label nose or hand or elbow, etc. Once the learner has an idea of the game, I may let them initiate it, or have them say “Find my nose” and I’ll place the parachute so their nose is visible.
  • Song Fill-ins – I like to sing songs while shaking or spinning the parachute. For students with autism or other language delays who struggle with this skill, the parachute can be a great motivator to help with song fill-ins and other intraverbal skills. I will sing the song while shaking or spinning the parachute, and I’ll stop singing AND moving the parachute when I want the child to fill in a word. As soon as the child fills in the word, I will begin singing and moving the parachute again. For many students, this is more motivating than a high five or saying “good job.”
  • Quick Responding – If you are working with learners with autism, the absence of quick responding is sometimes a serious barrier to learning. I have found that using the parachute isa  good way to motivate the student to respond quickly when presented with at ask by using it as described above with the song fill-ins. Once I am getting quick responding with the parachute, I quickly begin to work on generalizing the skill to other environments (such as the table or during a floor activity.)

Pros: There is a wide variety of activities that you can do with a parachute. As mentioned before, my experience has been that it is a great tool for motivating students who are difficult to engage. The parachute is also fantastic as a reinforcer or to use during a break. It is fun for students to play hide-and-seek with it, lie on the floor and have you lift the parachute high into the air then bring it down on top of them, or spin it in a circle. One final pro is that, depending on the size of the parachute, you can do these activities indoors. I have a parachute that is six feet in diameter, which is perfect for indoor activities with preschool and early elementary learners.

Cons: You have to think carefully about the environment in which you will be using the parachute and choose the appropriate size. Many parachute activities also require more than two people, so if you are working 1:1 with students, you should prepare ahead of time to ensure that a sibling or parent will be available to participate in the activity with you.

Remember, enter the promo code BLOGPP13 at checkout to save 15% on our Parachute Play this week only.

***This expires September 3, 2013 at 11:59 pm EST. Not compatible with any other offer. Be sure there are no spaces in the promo code at check out!

Product Review: Sandwich Stacking Game

We recently came across a wonderful review of the popular Sandwich Stacking Game by Melissa & Doug on TeachThrough. Here is everything you have ever wanted and need to know about the Sandwich Stacking Game and how a parent or educator would incorporate it into lessons for his or her child:

Age level: Preschool, Early Elementary

Description: This silly game come with two sets of bread-shaped gloves and fourteen sandwich fillings that attach with velcro to the bread. Add twenty sandwich cards and a booklet with ten different games you can play with the materials, and you have a recipe for a great game.

Skills & Modifications: First of all, I should mention that I love any game that comes with instructions for multiple games. The fact that this comes with instructions for TEN games makes it that much more valuable to me, and it makes my job easier! I can find games that meet the skill level of my student, and then modify them as needed. Also, while I have listed below many ways in which I focus on target skills with these materials, I always end the activity by allowing the student to choose a game or to have free play with the materials for a couple of minutes.

Expressive Language – Students are usually highly motivated by these materials, so I use them to create opportunities for expressive language. Sometimes I’ll have the student create any sandwich they want and then describe it to me. Other times I will create sandwiches with the goal of targeting specific words or phrases that I am working on with the student.
Alike & Different – Sometimes I’ll have the student make two sandwiches, then describe how the two are alike and different. This provides and opportunity to talk about different ingredients, but also to discuss order of ingredients using words such as top, middle, and bottom.
Block Imitation – This is another game that, while it does not use blocks, can be used to test for generalization of block imitation skills. You can use the pictures included with the game, but those are all limited to four ingredients on each sandwich. For some students I take pictures of bigger sandwiches I have made with the game materials and have them recreate it based on the picture.
Scanning – I use this frequently to practice scanning skills. I lay out all of the ingredients on the floor (though be careful if the floor is carpeted, the velcro pieces may stick!) The student has to look at the picture card or listen to my instructions and find the correct piece. If we are playing with a peer, scanning may be more challenging because the peer may pick up the piece first, causing your student to have to scan once more to find the piece needed.
Peer Play – This is another great game for peer or sibling play. Students are highly motivated by the materials, and are frequently interested to see what other people are making as well.

Pros: This is one of those games that consistently causes giggle-fits with my students. It’s silly, challenging, active, and fun. Oh, and it’s machine-washable.

Cons: I have no cons for this game. It is a little pricey compared to most games and toys I purchase, but the materials are high-quality (which is usually the case with Melissa & Doug products.)

Cost: $29.99 You should invest in this game if: your student or child is highly motivated by active games, you are looking for materials to increase potential for peer play, or you are working with a range of ages at the same time.

ABLLS: B6, B12, B20, C41, K5, K9, K14, L2, L12, L22

VB-MAPP: VP-MTS 6, VP-MTS 13

Written by Sam Armstrong, MSEd, BCBA

Pick of the Week: What are They Thinking? ColorCards

In continuation of last week’s theme of empathy and inference by asking and answering “wh-” questions, we are excited to bring you the What are They Thinking? ColorCards for this week’s Pick of the Week! These flashcards and accompanying CD with individual worksheets will help students develop empathy and inference, as they learn to recognize and interpret others’ emotions and behaviors. They are also a good resource for initiating conversation and storytelling. This week only, take 15% off your order of the What are They Thinking? ColorCards by using our promo code BLOGWTT6 at checkout!

Use this set with your child to explore the relationship between thoughts and feelings, as well as to recognize that behavior affects others.

Children will be asked to imagine what the people depicted in these cards are thinking and then fill in the thought bubbles, orally or in writing.

This process naturally exercises skills in observation, empathy, and social perception. Viewing these cards, students will improve their ability to read facial expressions, nonverbal cues, and surrounding circumstances.

This set comes with 30 cards, each measuring 8.25 by 11.75 inches, an instruction booklet, and a CD-ROM with images and worksheets that can be printed out.

This week, save 15% on the What are They Thinking? ColorCards by applying the promo code BLOGWTT6 at checkout!

*This offer is valid until August 27th, 2013 at 11:59 pm EST. Not compatible with any other offer. Be sure there are no spaces in the promo code at check out!

Pick of the Week: What? How? Question Set

Our pick this week is the What? How? Question Set! This set of cards teaches children to label and identify actions while learning how to ask and answer “what” and “how” questions.

This week only, save 15% on your order of the What? How? Question Set by using our promotional code BLOGWHQ3 at checkout!

Each of the “what” questions in the set requires a one-sentence answer; each of the “how” questions have 3 possible answers. If the answer to “What are they doing?” is “hugging,” then the answer to “How do you hug a friend?” is “open your arms,” “put them around your friend,” and “give a gentle squeeze”.

Each card measures 5 x 3.5 inches. Each concept presented in this photographic deck of 40 cards relates to a child’s everyday experiences, such as reading a book, blowing bubbles, playing t-ball, hugging a friend, cooking, and feeding ducks.

Remember, this week only, take 15% off your online order of the What? How? Question Set by entering in the promo code BLOGWHQ3 at checkout!

*This offer is valid until August 20th, 2013 at 11:59 pm EST. Not compatible with any other offer. Be sure there are no spaces in the promo code at check out!

Pick of the Week: VibraLite MINI Watch

Our pick this week is the VibraLite MINI Watch, our updated version of the popular VibraLITE Watch made specifically for children’s small wrists. This personalized vibrating watch is ideal for reminding children to engage in any variety of situations. This week only, save 15% on your order of the Vibralite MINI Watch by applying the promotional code BLOGVIBW5 at check out!

The VibraLite MINI Watch has a vibration alarm that won’t disturb others and can also be set to audibly beep when time is up. It can accommodate 12 different alarm setting and has an Auto-Reload Countdown Timer that automatically reloads to a preset time that can be set for seconds, minutes, or hours. The alert duration lasts 20 seconds, but can be stopped manually by pushing any button. The VibraLite MINI also offers a new lock feature and easy-to-read time digits. This watch is water resistant up to 50 meters and also features an electroluminescent backlight for viewing at night.

The VibraLite MINI will fit wrist sizes of 5.50″ to 7.20″ in circumference.

Remember, this week only, take 15% off your order of the VibraLite MINI Watch by entering in BLOGVIBW5 in the promo code box at check out!*

*This offer is valid until August 13, 2013 at 11:59 pm EST. Not compatible with other offers. Be sure there are no spaces in the code at check out!